To easily repair scratches on your wood trunk, start by evaluating their depth—light surface scratches can be concealed with a matching stain or touch-up marker, then buff for a seamless finish. For deeper gouges, fill with wax or a matching crayon, smooth out, and blend with a little stain. Finish by applying a protective coat to keep your trunk looking new. More tips to achieve a professional look are just ahead.
Key Takeaways
- Identify scratch depth by inspecting the surface and running a fingernail over it to determine repair needs.
- Use matching stain or touch-up markers along the grain for quick, seamless surface scratch repairs.
- Fill deep gouges with household materials like wood filler or matching wax, then sand and stain for a professional look.
- Smooth repaired areas with fine-grit sandpaper, following the grain to blend the repair seamlessly.
- Protect the trunk with a clear finish or oil, and use felt pads to prevent future scratches and maintain its appearance.

REALINN Wood Furniture Repair Kit- Set of 28 – Touch Up Markers, Fillers with Wood Putty – Repair Scratch, Cracks, Hole, Discoloration for Wooden Door, Floor, Table, Cabinet
KIT INCLUDES our most powerful wood repair compounds, so you can repair all levels of damage to wood…
As an affiliate, we earn on qualifying purchases.
As an affiliate, we earn on qualifying purchases.
How to Assess Scratch Depth on Your Wood Trunk

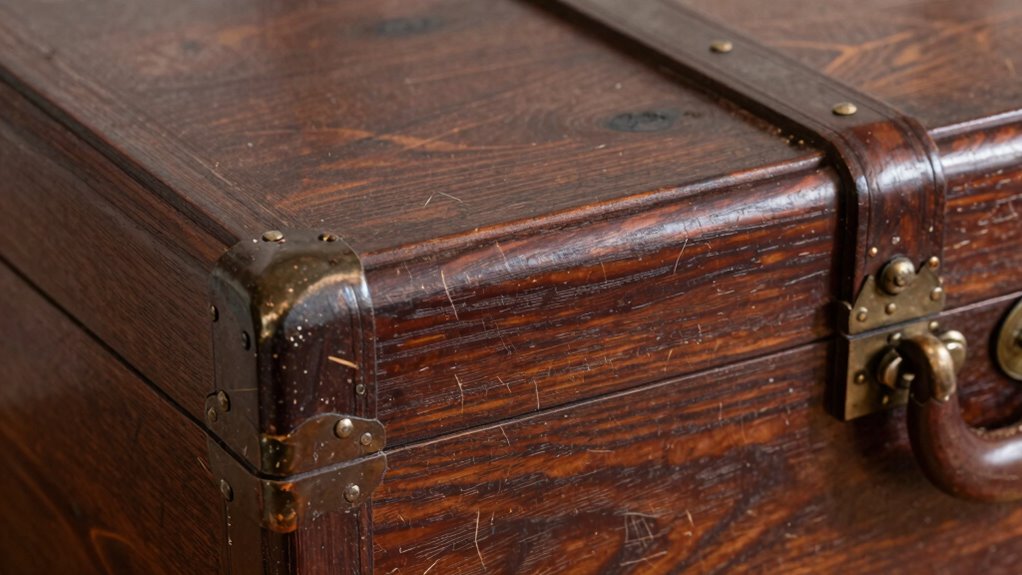
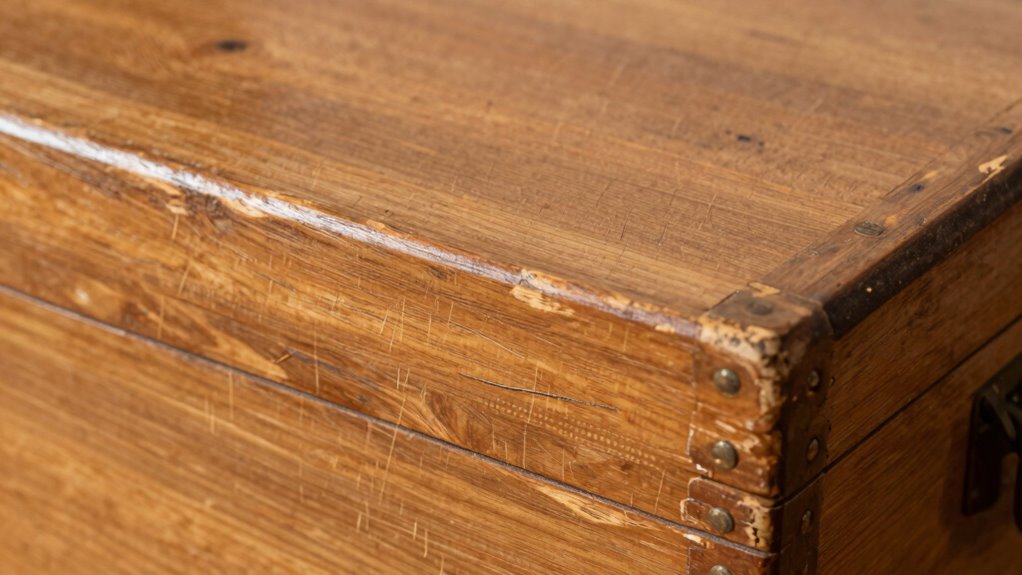
When evaluating scratches on your wood trunk, understanding the depth of each scratch is essential to determine the best repair method. First, observe the scratch’s impact on the wood grain. Light scratches usually only affect the surface, making them less visible and easier to fix. Deeper scratches disrupt the wood grain more considerably, increasing scratch visibility and requiring more intensive repair. To assess depth, run your fingernail over the scratch—if it catches, it’s likely deep. Use natural light to better see how the scratch interacts with the wood grain pattern. Visual inspection can also help you distinguish between shallow and deep scratches. Recognizing surface damage and its severity helps you choose the right approach for a seamless repair that restores your wood trunk’s appearance. Additionally, understanding wood grain patterns can assist in blending the repair for a more professional look. Knowing how wood finishes react to repair techniques can further improve the final result. It’s also helpful to familiarize yourself with repair techniques suitable for different scratch depths to ensure a proper fix.

Furniture Repair Kit Wood Markers – Set of 13 – Markers and Wax Sticks with Sharpener Kit, for Stains, Scratches, Wood Floors, Tables, Desks, Carpenters, Bedposts, Touch Ups, and Cover Ups
PRODUCT DETAILS – This 13 piece kit includes 6 Repair Markers, 6 paper wrapped wax sticks and 1…
As an affiliate, we earn on qualifying purchases.
As an affiliate, we earn on qualifying purchases.
What Causes Scratches and How They Affect Your Furniture
Scratches on your wood trunk often happen from everyday activities like moving items or accidental bumps. These surface damages can dull the wood’s natural shine and make it look worn out. Understanding what causes these scratches helps you protect your furniture and maintain its appearance.
Causes of Surface Damage
Have you ever wondered what causes surface damage on your wood trunk? Often, it’s the way the wood grain interacts with daily use, making certain areas more vulnerable to scratches. Items like keys, jewelry, or sharp objects can easily scrape the surface finish, especially if it’s worn or thin. Rough handling or dragging objects across the surface creates micro-abrasions that become visible over time. Additionally, exposure to moisture or heat can weaken the surface finish, making it more susceptible to scratches. Even cleaning with abrasive materials can cause tiny scratches that dull the wood’s appearance. Understanding these causes helps you take better care of your trunk, preventing unnecessary damage and maintaining its beautiful surface. Moreover, the type of surface finish and the level of color accuracy can influence how visible scratches are on your wood surface. Being aware of surface vulnerabilities can also guide you in choosing the right protective measures. Recognizing the impact of surface wear and surface integrity can further help in implementing effective preventative strategies.
Impact on Wood Appearance
Scratches on your wood trunk directly impact its overall appearance, often making it look worn or damaged beyond repair. These marks disrupt the smooth, even surface, drawing attention away from the trunk’s natural beauty. When scratches are deep or numerous, they can cause color mismatches, making the damaged area stand out sharply against the surrounding finish. Proper color matching during repair is essential to restore a seamless look. Without it, the repair may be obvious and diminish the trunk’s visual appeal. Finish restoration techniques help blend the repaired area with the original surface, improving overall aesthetics. Additionally, understanding wood finishing techniques can aid in achieving a more professional repair. Using appropriate repair tools and materials ensures a more precise and durable fix. Addressing scratches promptly and accurately guarantees your wood trunk maintains its attractive appearance and prolongs its lifespan. Regular maintenance and protective measures, such as applying suitable protective finishes, can prevent future damage and keep your furniture looking its best. Being aware of proper maintenance practices can further extend the life of your furniture and minimize the risk of scratches in the future. Incorporating preventive care routines helps protect your wood furniture from future harm and maintains its beauty over time.
Furniture Repair Kit Wood Markers – Set of 13 – Markers and Wax Sticks with Sharpener Kit, for Stains, Scratches, Wood Floors, Tables, Desks, Carpenters, Bedposts, Touch Ups, and Cover Ups
PRODUCT DETAILS – This 13 piece kit includes 6 Repair Markers, 6 paper wrapped wax sticks and 1…
As an affiliate, we earn on qualifying purchases.
As an affiliate, we earn on qualifying purchases.
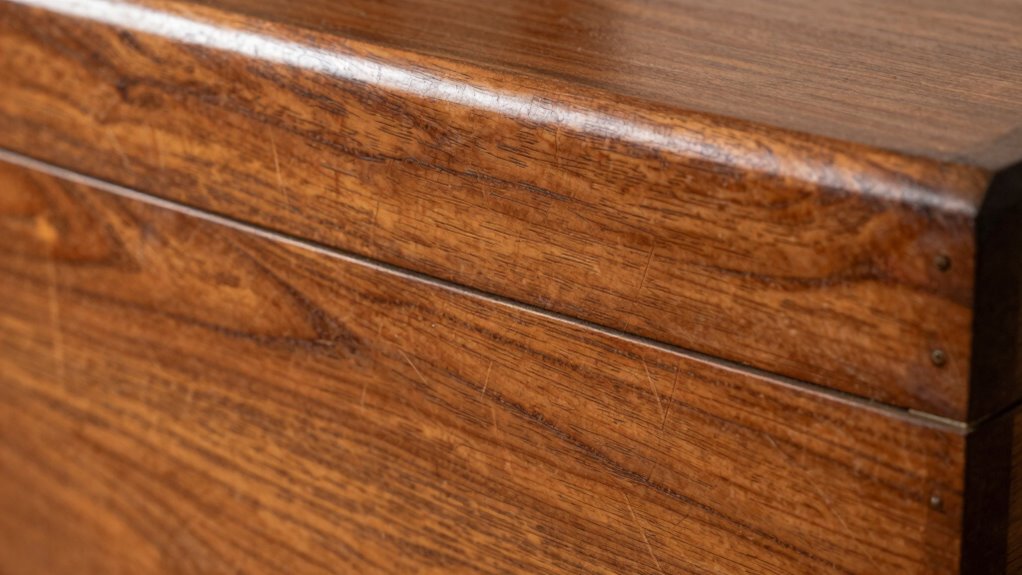
Quick Fixes for Light Surface Scratches
Light surface scratches on your wood trunk can often be a quick fix if you act promptly. First, identify the wood grain direction to ensure smooth blending. Use a matching stain color or a touch-up marker for minor scratches, applying it along the grain for seamless repair. For a subtle shine, buff with a soft cloth after applying stain or wax.
| Step | Technique | Tip |
|---|---|---|
| 1 | Clean the area | Remove dust and debris |
| 2 | Apply stain or marker | Match the existing stain color |
| 3 | Buff gently | Blend the repair into the surrounding wood |
| 4 | Use wax or polish | Enhance shine and protect |
| 5 | Observe the fix | Ensure scratches are less visible |

Minwax 233334444 Polycrylic Protective Wood Finish, Clear Satin, ½ Pint
PROTECT WOOD SURFACES – Minwax Polycrylic Protective Finish protects and adds beauty to your interior wood projects, including…
As an affiliate, we earn on qualifying purchases.
As an affiliate, we earn on qualifying purchases.
How to Repair Deep Gouges Using Household Materials
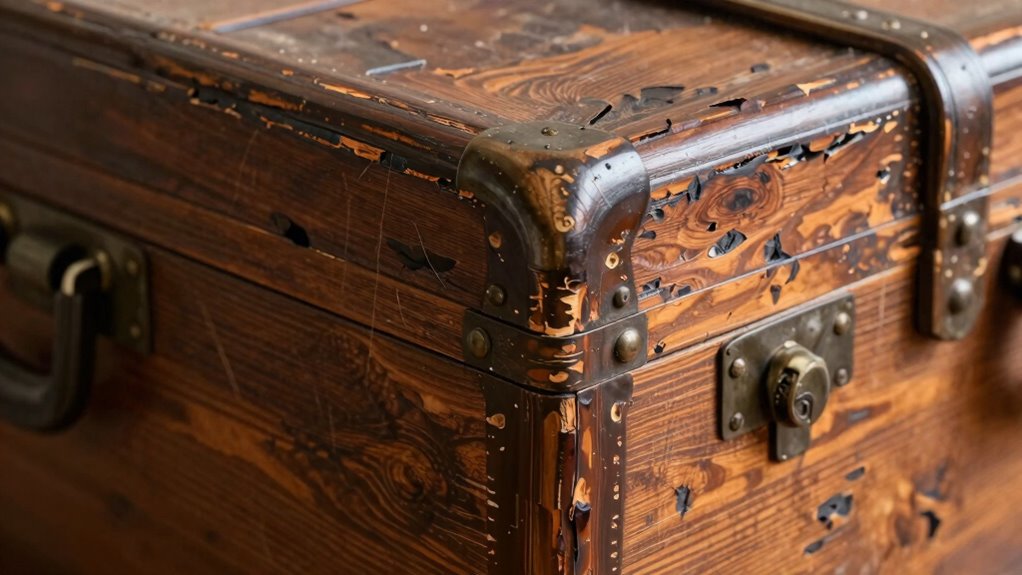
To repair deep gouges, you need to choose household items like matching crayons, wax, or wood filler. Once you’ve selected the right material, apply it carefully into the gouge, making sure to fill it completely. Then, blend and smooth the repair to match the surrounding wood for a seamless finish. Understanding fandom’s past, present, and future can help you appreciate the importance of maintaining the integrity of your wood furniture as part of your home environment. Proper wood repair techniques ensure your furniture remains durable and attractive over time. Additionally, practicing consistent maintenance routines can prolong the lifespan of your furniture and prevent future damage. Incorporating air purifier maintenance dos and don’ts into your routine can help keep your indoor environment clean, which indirectly supports the health of your wooden furnishings. Recognizing the importance of environmental factors can also guide you in choosing the best repair products for your specific needs.
Selecting Suitable Household Items
When tackling deep gouges in your wood trunk, you can often find effective repair materials right around your home. For a seamless color match, look for a wood stain that closely matches your trunk’s finish. You can apply the stain with a small brush or cloth directly into the gouge, then wipe away excess for a natural look. Furniture polish is also useful; after the stain dries, a light coat can help blend the repaired area and restore the wood’s shine. Gather old toothbrushes, cotton swabs, or soft cloths to help apply and blend the stain smoothly. Keep in mind that selecting the right shade and finish is key to making the repair look professional and discreet. Additionally, using pet-friendly cleaning products can help maintain your furniture without harming your pets. Being aware of wood repair techniques can further enhance your ability to handle such imperfections effectively, especially when choosing the appropriate repair tools and supplies. Remember to properly prepare the surface before applying any repairs to ensure the best results.
Applying and Blending Repair Material
Once you’ve chosen the right stain and applied it to the gouge, it’s important to blend the repair seamlessly into the surrounding wood. Start by using light sanding techniques around the repaired area to smooth out any excess material and guarantee a flush surface. Carefully sand with fine-grit paper, working in the direction of the grain to avoid scratches. After sanding, apply a matching wood stain to the repaired spot. Use a small brush or cloth to blend the stain into the surrounding finish, building color gradually. Multiple light coats may be necessary to achieve a uniform appearance. This careful application and blending process will help your repair look natural and professional, restoring your wood trunk’s smooth, polished finish. Additionally, understanding media literacy can help you better evaluate the quality of online tutorials or products for DIY repairs. Being informed about home repair products can also ensure you choose the most effective materials for your project. Recognizing the benefits of using airless paint sprayers in other painting projects can inspire you to explore efficient tools for future home improvements.
Finishing and Protecting Your Restored Trunk

After restoring your trunk, applying the right finish is essential to protect the wood and enhance its appearance. Whether you’re doing a diy restoration or touch-up, choosing an appropriate protective finish ensures your work lasts. Clear polyurethane or varnish creates a durable barrier against scratches and moisture, giving your trunk a professional look. For a more natural appearance, consider oil finishes like tung or linseed oil, which penetrate the wood and highlight its grain. Always apply finishes in thin, even coats and follow the manufacturer’s instructions for drying times. Proper finishing not only safeguards your repair but also elevates the overall aesthetic. Taking the time to finish your trunk properly guarantees your restoration remains beautiful and protected for years to come.
Tips to Prevent Scratches and Keep Your Trunk Looking New

Applying a protective finish helps guard your trunk against scratches and damage, but maintaining its look over time also requires ongoing care. To prevent scratches, focus on preserving the wood grain’s natural beauty and ensuring color matching remains consistent. Keep your trunk in a safe environment, away from sharp objects and rough handling. Regularly clean the surface with a soft cloth to remove dust that can cause micro-scratches. Use felt pads or liners on high-contact areas to absorb impact and prevent damage. When moving or storing your trunk, lift it carefully rather than dragging. These simple tips help maintain the wood’s integrity, enhance the wood grain’s appearance, and keep the color matching vibrant, ensuring your trunk looks new for years to come.
Frequently Asked Questions
Can DIY Repairs Permanently Damage My Wood Trunk’s Value?
DIY repairs can risk damaging your wood trunk’s value if not done properly. Poorly executed fixes might look unprofessional, decreasing its appeal and valuation. However, if you follow proper techniques, using the right materials and tools, you can restore your trunk without harming its worth. Always weigh DIY repair risks against professional help to ensure your wood trunk maintains its value and looks great.
Which Wood Finishes Are Most Scratch-Resistant?
You’re in the driver’s seat when choosing a scratch-resistant wood finish. Among the best options are polyurethane, epoxy, and marine varnish, all offering superior durability. In a wood finish comparison, these scratch resistant coatings stand out for their toughness and longevity. They create a resilient shield that keeps your trunk looking new longer. Just remember, a good finish can turn a potential problem into a showcase of craftsmanship.
How Long Does a Typical Scratch Repair Last?
A typical scratch repair, like lacquer touch ups or veneer patching, lasts about 1 to 3 years depending on usage and exposure. To prolong the repair, keep the trunk in a stable environment and avoid heavy handling. Regular maintenance, such as cleaning and applying protective finishes, helps maintain the repair’s appearance. With proper care, your repair can look professional and last longer, saving you time and money.
Are There Eco-Friendly Products for Wood Scratch Repair?
Think of eco-friendly wood repair products like natural oils and biodegradable waxes as a gentle rain nourishing your wood. Yes, many eco-friendly options exist, helping you repair scratches without harming the environment. These products often contain plant-based ingredients, making them safe for your home and the planet. By choosing natural oils and biodegradable waxes, you’re giving your trunk a professional look while supporting sustainability and reducing chemical exposure.
How Can I Match Repaired Areas to the Original Finish?
To match the repaired area to the original finish, you should carefully choose a color-matched stain or touch-up pen that complements the existing finish. Use light, controlled repair techniques like blending with fine sandpaper or a soft cloth, and build up color gradually. Testing your repair on an inconspicuous spot first guarantees a seamless match, making your fix look professional and integrated with the rest of the wood trunk.
Conclusion
Now that you know how to tackle scratches like a pro, your wood trunk will stay flawless for decades—outlasting furniture from museums! With just a few simple tricks, you could turn your trunk into a shiny, scratch-free masterpiece that even art galleries would envy. So go ahead, arm yourself with these tips, and keep your trunk looking so stunning, it’ll make every other piece in your home look like it’s seen better days.