TL;DR
A closet can become a decent recording space with targeted acoustic dampening and smart placement. Moving the rig away from your workspace is the best noise reduction, while treating reflections and sealing gaps improve sound quality without sacrificing usability.
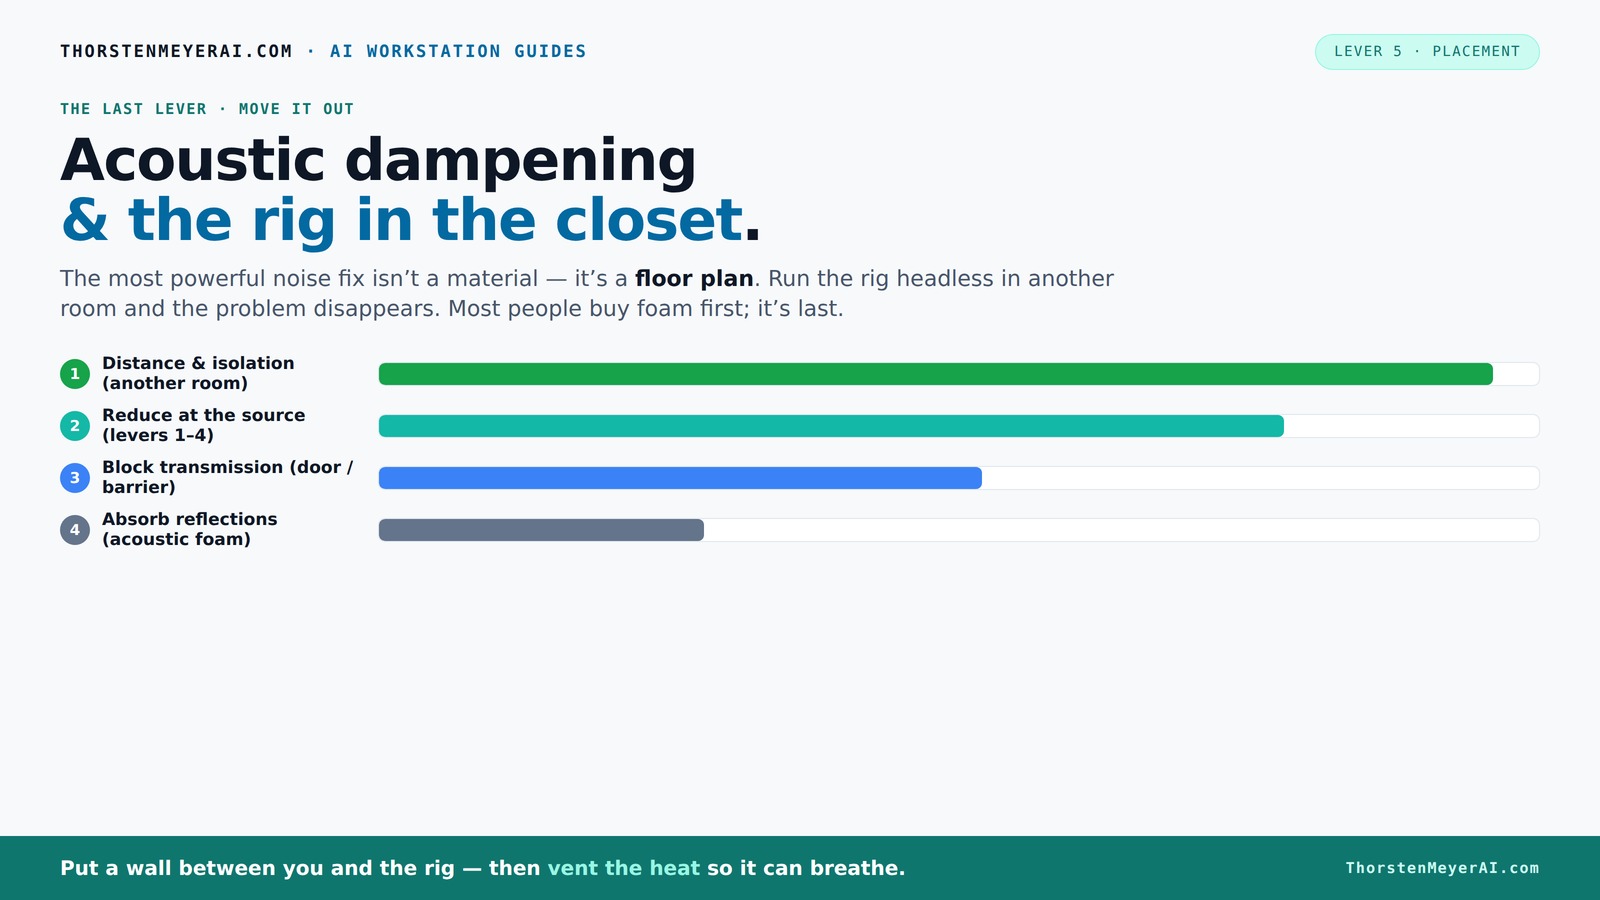
Acoustic dampening
& the rig in the closet.
The most powerful noise fix isn’t a material — it’s a floor plan. A rig you can’t hear because it’s in another room beats any amount of foam. Tap the approaches in Part 1 to see what actually works.
(another room)
(levers 1–4)
(door / barrier)
(acoustic foam)
Contain the noise, not the heat
Key Takeaways
- Moving your rig into another room or closet eliminates most noise and simplifies treatment efforts.
- Prioritize reflection point treatment—place foam and blankets where sound bounces back to the mic.
- Seal gaps around the door and vents to prevent sound leakage and improve isolation.
- Ensure proper ventilation to prevent heat buildup, especially in sealed closet setups.
- Use targeted, minimal treatment—overdoing it can make your space cramped and less functional.

Focusound 52 Pack Acoustic Foam Panels 1" x 12" x 12" Sound Proof Foam Panles Soundproofing Noise Cancelling Wedge Panels for Home Office Recoding Studio with 300PCS Double-Side Adhesive
Soundproofing - Acoustic foam panels triangular grooves structure for better noise absorption, helps to reduce and absorb unwanted...
As an affiliate, we earn on qualifying purchases.
As an affiliate, we earn on qualifying purchases.
Why a Closet Can Be Both a Blessing and a Curse
Closets are small, enclosed spaces. That means they bounce sound around in weird ways, creating a boxy, muffled tone. But they also trap sound, making them a perfect spot to control noise with some clever tricks.
Imagine recording vocals; the closet’s tight walls can boost bass frequencies and cause standing waves. Yet, if you treat it right, you can tame these issues and create a cozy, quiet zone. The key is knowing what’s possible and what’s a waste of effort.

Ultimate Portable Vocal Booth for Home Recording, Reduces Echo & Reverb
The Original & Best Portable Vocal Booth — Snap Studio created the category. Pop-up recording space for singers,...
As an affiliate, we earn on qualifying purchases.
As an affiliate, we earn on qualifying purchases.
Dampening vs. Soundproofing: What You Actually Need
Many think adding foam panels is enough. But acoustic dampening and soundproofing are different beasts. Dampening reduces echo and early reflections inside the space by absorbing sound waves, which helps clarify recordings and reduces muddiness. Soundproofing, on the other hand, involves preventing sound from escaping the space—crucial if you want to avoid disturbing neighbors or household members.
In a closet, your primary goal is dampening because it improves sound clarity and reduces the 'boxy' sound that small spaces tend to produce. To enhance noise isolation, sealing gaps with weatherstripping or acoustic sealant is essential, as these are common leakage points. However, true soundproofing—adding mass or creating a sealed, insulated enclosure—requires more effort and resources, and may not be practical in a closet setting.
The tradeoff is that dampening makes your recordings sound better within the space, while soundproofing is mainly about external noise control. Knowing which to prioritize depends on your environment and goals.

Versare VersiPanel Acoustical Partition Wall - Sound Panel Classroom Office Room Divider, Flexible Arrangement, Easy Roll-up Storage (Gray, 8'Wide x 6'6"Tall)
ACOUSTIC: These portable partition walls are constructed with acoustical ribbed fabric and heavy foam cores.
As an affiliate, we earn on qualifying purchases.
As an affiliate, we earn on qualifying purchases.
The Best Spot to Place Acoustic Treatments in a Closet
Where you place your panels and blankets matters more than how many you cover. Start with the reflection points: the wall behind the mic and the wall facing the sound source. For more details, see this guide on acoustic treatment placement. These are the surfaces where sound bounces directly into your microphone, causing coloration and muddiness.
For example, if you're recording vocals facing the closet door, treat the wall behind you and the side walls where reflections bounce. Use foam panels, rugs, or blankets at these points to absorb early reflections. Bass traps placed in the corners are especially important because they target low-frequency buildup caused by the small, parallel surfaces that resonate and amplify bass frequencies, leading to a boomy sound.
Here's a quick guide:
- Place foam at reflection points—behind the mic, side walls, ceiling, and floor.
- Use thick blankets or rugs to cover larger surfaces without blocking access or airflow.
- Install bass traps in corners—especially where low-end mud builds up, to prevent a boomy, unnatural sound.
Think of it as sculpting the sound environment; targeted placement ensures you get the best acoustic results without cluttering your space.

Sound Addicted - Studio Monitor Isolation Pads for 5 Inch Monitors, Pair of Two High Density Acoustic Foam which Fits Most Speaker Stands | SMPad 5
SMPad 5 is made out of the highest quality acoustical foam (50kg/m^3 density).
As an affiliate, we earn on qualifying purchases.
As an affiliate, we earn on qualifying purchases.
How to Seal the Closet Door and Gaps for Better Soundproofing
The closet door is the weakest link in soundproofing. Gaps around the door let sound leak out and noise in, undermining your efforts. For tips on sealing gaps, check out this article on acoustic sealing. Sealing these gaps with weatherstripping, draft stoppers, or even heavy blankets can significantly reduce sound escape and ingress.
For a tighter seal, use acoustic caulk around the door frame to fill in small gaps, which prevents sound leaks at the source. Additionally, hanging a heavy curtain or blanket over the door acts as an extra barrier, absorbing sound and reducing echo inside the closet. This combination helps contain sound within the space and minimizes disturbance outside.
Remember: completely sealing a closet is challenging. For higher levels of soundproofing, consider installing a door sweep, replacing the door with a heavier, sealed model, or adding mass-loaded vinyl to the door. Each of these options involves tradeoffs with accessibility and ventilation, so choose what aligns with your priorities.
Dealing with Heat When the Rig is in a Closet
Putting a hot, powerful rig in a sealed closet sounds convenient but can turn into a fire hazard. The heat generated by components like GPUs and CPUs can build up rapidly, especially in small, enclosed spaces without proper ventilation. Overheating can cause shutdowns, performance throttling, or even hardware damage.
The fix? Ventilation. Use passive vents, exhaust fans, or ducted systems to move hot air out of the space. Proper airflow prevents heat buildup and maintains safe operating temperatures. For example, a quiet exhaust fan pulling hot air out of a closet can keep temperatures stable without introducing noise that interferes with recordings.
Additionally, some manufacturers offer purpose-built soundproof cabinets that incorporate acoustic foam with temperature-controlled airflow systems. Investing in such solutions can balance sound isolation with thermal management, ensuring your rig runs safely and efficiently without sacrificing sound quality.
DIY Tips for Optimizing Your Closet Studio Without Making It a Nightmare
Space is tight, and over-treatment can turn into a clutter nightmare. Use strategic placement: mount panels on shelves or walls at accessible heights, hang blankets over door gaps, and avoid blocking electrical outlets and access points. Keeping your space organized ensures safety and ease of use.
For example, hang foam panels from curtain rods or thumbtacks, and drape blankets over the door with hooks or velcro so they can be easily removed or repositioned. Keep cables organized with clips or cable management sleeves to prevent tripping hazards and clutter. Regularly reassess your setup to balance effective sound treatment with practical accessibility.
Remember, a cluttered space hampers workflow and can compromise safety. Balance sound treatment with ease of access and airflow, creating a space that’s both acoustically optimized and comfortable to work in.
Common Mistakes to Avoid in Your Closet Rig Setup
Don't treat every inch with foam—this can deaden your sound and make the space feel cramped. Overusing foam can absorb too much high-frequency content, resulting in dull recordings that lack brightness and clarity. Avoid sealing everything without considering ventilation; this can cause heat buildup, risking damage or fire hazards. Don’t ignore the door gap or low-frequency issues in corners, as these are common leakage points and resonant areas that compromise sound quality.
For example, over-treating can create a dead-sounding environment, while neglecting proper ventilation can lead to unsafe conditions. Low-frequency problems in corners can cause boomy, unnatural sounds if left unaddressed. Instead, focus on treating reflection points, sealing gaps thoughtfully, and maintaining airflow for safety and sound quality.
Picking the Right Gear for a Closet Studio
Choose a microphone suited for small spaces—cardioid mics are better at rejecting room noise and focusing on your voice or instrument. Use a pop filter and a shock mount to reduce unwanted vibrations and plosives, which are especially noticeable in tight environments. Keep your gear organized with shelves, cable management, and a dedicated workspace to streamline your workflow and avoid clutter.
Consider a small audio interface and closed-back headphones for monitoring, as they help isolate sound and prevent bleed into your recordings. For example, a Rode NT1-A paired with headphones like the Audio-Technica ATH-M50x offers clear, detailed sound in confined spaces, helping you produce professional-quality recordings without needing a large setup.
Key Questions About Closet Recording Spaces
- Do I need acoustic treatment or soundproofing? Focus on dampening reflections first; soundproofing is for preventing sound escape and requires more effort. Prioritize based on your environment and needs—if noise leakage is minimal but reflections cause issues, dampening is the best first step.
- Where should I place panels? Target reflection points—behind the mic, side walls facing the sound source, ceiling, and floor. Proper placement at these points absorbs early reflections that can color your recordings, leading to a clearer, more natural sound.
- Are bass traps necessary? If you notice low-end boominess or muddiness, especially in the corners, invest in bass traps. They help control low-frequency resonances that small spaces tend to amplify, resulting in tighter, more balanced recordings.
- Can foam panels work in a closet? Yes, but their effectiveness depends on placement. Foam panels are most useful at reflection points. Relying solely on foam for bass control or full room treatment is insufficient; combine with bass traps and sealing for best results.